In Stitching News this and next month I thought I would explain my preferred methods and approaches to planning new work.
In order to do this I shall start by reminding you of my current work. In this blog I am really focusing on designs where I have used the Fibonacci numerical sequence; more detail of this later on!
Using Fibonacci as a base I can create grids, and once you understand the process of creating a grid….you can “break the rules” or even invent new ones!

This picture was taken a few months ago when I had just finished piecing this house panel but I had not started quilting it.
As I have been very busy since then, I am only just coming back to it.
I have now quilted in the ditch, but need to do some additional quilting which will pull the whole piece together!
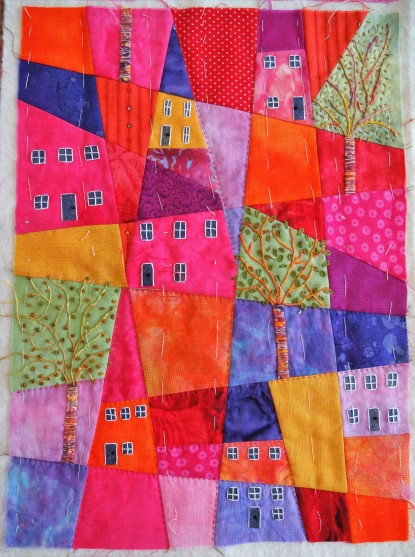
When I posted the photo of this piece, I had started quilting in the ditch, as shown here, but that was all.
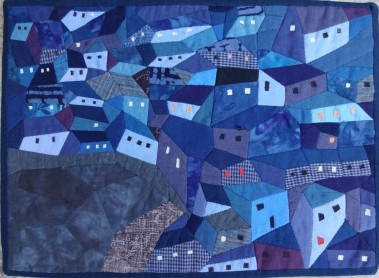
I have just finished quilting in the ditch, this last week and have now started quilting the overall lines, as shown in the photo below.

I marked my quilting lines with a hera marker against a ruler. They are perpendicular to the edges of the panel and purposely not equidistant!
The hera marker is a little plastic tool, which is easy to hold and has a flat “sharp” curved edge at one end, and a pointed end at the other. I used the curved edge against the ruler. When you quilt on top of this line it doesn’t show any more because it disappears into the stitching.
Notice the difference between the area where I have quilted the grid on the left and the area still to do, to the right of centre. I am just ruling the lines as I go.
These two panels are the beginning of my new series for the next exhibition and I will come back to them later in the blog. They have been designed on a distorted grid, which “sort of ” had a Fibonacci guide, to start with!
I belong to a small textile group; lovely talented ladies who all have different skills, and work in different media. Earlier in the year we started planning for our next exhibition which will be in 2020. That may seem a long way away, but it is only a couple of months before it will be 2019!
I was really excited as I drove home from the meeting, and my mind was supercharged. What was I going to do? How would I come up with meaningful ideas for me, because I have to be excited and enthused about what I am working on or it will have no meaning or heart! I knew what direction my work would take, by the time I got home, and how to get started, which was really exciting! I did a little scribble on a scrap of paper as soon as I got home! That was the start!!

Quite quickly I followed this up, cutting some narrow strips from a magazine gluing them down. and drawing within the grid. I had no definite plans when I did this, other than houses but was thinking about a structure, and how I might work with it!

It is really important to jot any thoughts down as soon as you have them. These may just be words; scrappy sketches, anything that may lead to moving the ideas along! You don’t need a prepared sketch book…scrap paper, and envelope anything will do. When you get a chance you can become more organised. I have had several things collected together with a paper clip, and am only just beginning to sort them into order in my book.
You may not like your results when you are exploring ideas. I certainly don’t always like what I am doing. I spent a long time painting a back ground on my design for the third panel recently, and was very disappointed. It did nothing for me!! I eventually cut it up and something good resulted from this and I felt fired up again! I have to admit though that it is as useful to find out what you don’t like, as much as finding out what makes you smile!! More of this later, too!
So, it is evident from the above illustrations that I am interested in grids!
Now, at this juncture I will give some information about my stitching background.
For years I have travelled around giving talks about my stitched work to patchwork groups, and am frequently told “You are so lucky, Di, you have so many ideas!” I have equally frequently said “but they don’t just happen!” and hopefully by the end of this newsletter you will be able to understand what I mean.
I started a quilting supplies business called “Patches” in the basement of our home in the 80’s and started teaching basic patchwork classes at home. My mother taught me simple patchwork in my late teens, and I had built on that whenever I had the opportunity.
One thing led to another and I was asked to teach a patchwork night class in adult education. I was terribly nervous, but I prepared thoroughly and after the first two or three weeks or so, I settled into the routine, and loved it. The ladies were mostly completely new to patchwork and the classes hummed as they grew together in friendship, as well as confidence in what they were doing.
I was soon able to offer a day class in the College building, which suited me better. After a few years I was asked to teach City and Guilds patchwork. This was enormous for me as I had never done the course myself. It was new for the College as they hadn’t taught it before either! Eventually, under pressure, I agreed to help them out of a situation by just teaching for one term! I was told that it really was just to be for one term teaching technique, because they had a tutor who could start after that. Ha! Ha! That was the start of a HUGE learning curve…..and hours and hours and hours of preparation. One term stretched into many more years! I have to say that there was a very legitimate reason why the intended tutor had to back out.
I was delighted in the end that I hadn’t done the course before, because I was working through the syllabus, and in conjunction with a wonderful experienced teacher, Joan, who mentored, encouraged and supported me in College, I was enabled to approach and teach the course in my own way!
After a couple of years, I joined my students in their design classes for a year…and gained my design certificate. This gave me a set of new skills. We had a great tutor, and I loved the course, soaking it up like a sponge! I knew I had to really work hard as I would be teaching the whole syllabus after this. I had a body of work, with lots of samples which were a terrific resource for teaching. I developed more ideas for teaching purposes, which also fuelled my tank, producing fresh material for stitched samples etc. It made so much more sense that I was now teaching the whole syllabus.
It worked well, and I was so proud of the work that my students produced for their end of course exhibitions.
I was also privileged to spend three excellent week-long residential courses taught by Susan Denton in the mid 90’s. I attended one per year, and had the opportunity to work through and develop ideas from a starting point through to stitch. Susan was instrumental in teaching me really basic design approaches for patchwork and quilting and even now I come back to that work, time and time again. I have further explored and extended those techniques, pushing them on another stage each time I play with them! This work rarely fails to suggest yet another idea; I tweak the design ideas once more, and begin to smile, and hey ho, I am off on another journey!
My house panels, in the new series, are a prime example of this! Ideas are developing yet again from that original and extended body of work!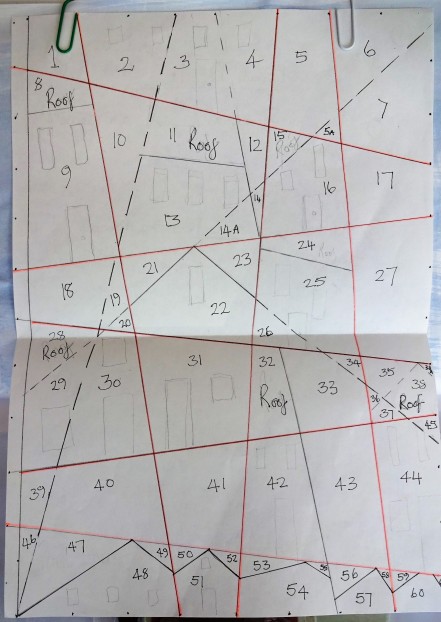
I started with a blank piece of A4 paper, and drew dots an inch apart all around the perimeter. I used these as a reference from which to draw some vertical and hoizontal lines (in red) to form my grid. You will understand the purpose of the dots later in this story!
The red lines are major construction lines, necessary when joining small units into bigger units; a process which happens in every assembly of work with some form of grid.
The blue and red stitched house panels both start with this same grid. But I have drawn in additional lines for the little blue panel to give me more design options. I can see more “houses” now! For the red panel design I removed those additional lines, and drew two or three different additional lines, for the same reason. A slightly different result!
Designing with grids inevitably involves mathematics. I am hopeless at maths. (My maths o-level teacher, told me that I had an ice cream’s chance in hell of passing”! I did pass, and didn’t get the lowest grade either.) For me a grid is very liberating and gives a strong base on which to build. Over the years I have come to realise that I feel very comfortable with this way of starting fresh work.
I use the Fibonacci sequence often in my work, because I know it will always look balanced. The photograph below is of my quilt, “Glimpses”, which I entered into the Festival of Quilts this year it was entirely designed around the Fibonacci sequence.
Fibonacci is explained further on! Keep reading!

With several years of Part l under my belt, I then began to teach Part ll, or the Diploma, as it became known. I spent two years gathering together a large body of work by working steadily through the syllabus; creating new exciting ideas as I grew in confidence myself, and learning a vast amount along the way! I took my finished body of work to show the then National Adviser for C&G in patchwork and quilting. She said to me “if you had a log book I would be very happy to sign it off for you Di”.
Within the C&G Diploma course the students must gather a “mathematical ” body of work together. I loved this section of the syllabus, and explored and experimented with it endlessly, learning the basics and then bending the rules! This included distorting the grids and creating extension ideas. By the time I came to teach it I felt very comfortable with it, and was able to enthuse the students.
Look up Fibonacci! He was a 13th Century mathematician who, by studying the patterns in nature, devised the mathematical sequence which produced perfect spirals and the way trees produced their branches etc. The formula gives perfect results every single time and is used extensively in many creative environments and design processes. It is used in a very wide area of art and design; in architecture; music etc……
The sequence is:1,1,2,3,5,8,13,21 etc. Simply explained, it is a series of numbers in which each number ( Fibonacci number ) is the sum of the two preceding numbers.
1+1=2 1+2=3 2+3=5 3+5=8 5+8=13 8+13=21 and so on.
Say it out loud to yourself! It will make sense. The sequence does not have to be used in this given order. The order can be altered. Numbers can be repeated, and you choose your own “unit” size. 1 equals your chosen unit size.
If you choose one inch as your unit size then the sequence would be: 1″ 2″ 3″ 5″ 8″ etc. I often work on a small scale, so I just use the start of the sequence often from 1-3 or 1-5.
If you chose a unit size of 2 cm, then the sequence would become 2cm 4cm 6cm 10cm 16cm etc. The order of the sequence can be whatever you like, individual units can be repeated as you can see in the Glimpses quilt above. The Fibonacci scale can be used on any grid, vertically and/or horizontally.

Here and below are a couple of pages from one of my sketch books when I was working out ideas for a section of houses in my Mevagissey quilt design. I used Fibonacci as a starting point.
In the top left corner, I see that I had made a tiny note that the unit size was 1/4″.
In the bottom right hand area, I had written the start of the mathematical sequence, 1 2 3 5 8, and under each of those numbers I had noted down what each number would be represented as. The measurements would translate as: 1/4″, 1/2″, 3/4″ 1 1/4″ and 2″…. I had also written notes of possible techniques to use.
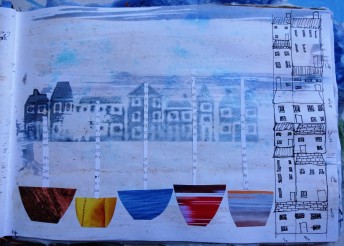

The paper weaving, on the right, above, uses strips of paper relating to the unit size I had chosen for my Mevagissey quilt. I have then just made some simple line drawings of buildings on the weaving. It totally makes sense of the weaving for this context. imagine the weaving without the drawing on it. It is still a well proportioned result, and could make a lovely cushion with torn strips of fabric, for instance! Weavings become more interesting with different width strips. The fibonacci sequence to takes all the angst out of wondering what width to use…..
All these ideas have a basic grid formation.
The following piece of work was designed around a postcard of Port Isaac, (shown below). This is the village featured in the Doc Martin series!
I bought the postcard the day before I left to go home after one of the residential courses with Susan. When I got home Rob, my husband, asked me what I had learned. I said “I will show you”: I showed him the postcard and within ten to 15 minutes had drawn the bare outline drawing of the village on a curved hexagonal grid! I surprised myself! I had really stretched myself that week, but wow, it was well worth it!

Apologies for the poor quality of the postcard photograph. It is a night view of the village to start with, and trying to eliminate the glare of the gloss finish on it was impossible for me!
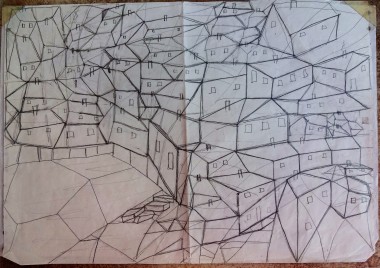
This was the hexagon grid I drew! I had to rub out many “internal” lines on the grid, as I created the houses. When I added windows, it instantly turned the grid into the “village” scene. This drawing then became my master, from which I created all the templates for the little quilt! I traced it onto freezer paper and marked every tiny piece of both copies with a letter or number to identify its rotation and position. The freezer paper shapes became my “papers” for the English piecing.
I made it in 1999, a year after I created the design; almost twenty years ago!
An interesting fact is that all the fabrics were scraps I gathered from the waste bins at the end of my classes!
In 2003 I also had an opportunity to study for the HNC in Stitched Textiles, at College. It was a joy to be “fed” instead of “giving of myself” continually. I wasn’t able to attend the classes as I was teaching full time by then, so I became a distance learning student, working at home, but I could obviously liaise very easily with my tutor. During that 2 years I continued to build on my technical and design skills.
So, you may well imagine that I have many resources to be pulling design ideas from! They don’t just “happen”. They are the result of, probably, an accumulation of hundred’s of hours of work over the years!
Take every opportunity you can if you want to progress in your skills and ideas. Tenacity and “the doing” creates the ideas. If there is a will, there is a way!
Returning to the two quilts at the top of the blog. All the way home from the textile meeting when we had started to plan the next exhibition I was thinking back to the design work from my mathematical file and I knew that that would be my starting point! The basis of the designs for the two quilts was Fibonacci. It gave me a starting point! I started with a blank piece of A4 paper, and I made a mark at every inch, all the way around the perimeter of the paper, and used these indicators for the grid. You can see the red lines going between the dots across the page. Sometimes I left one inch between the start or end of the lines, other times two or even three inches. Perhaps you can now understand how I can manipulate the Fibonacci sequence to my own ends. Nothing wrong with that! The grid inch markings give me somewhere to start.
I started thinking about my third panel a few days ago, and I will begin my next Stitching news with that!
Happy Stitching.
